30 March 2012

Week 4 Cleaning Clutter: Reader's Choice

This week in the word of clutter: the basement.

EEEKK! Mainly due to the fact that since we moved in in July I have gone through about zero boxes. 

We had left over "stuff" that we just kept in boxes and haven't even unpacked. Fair enough, there is one box labeled wedding things. That one will stay like that. Hopefully forever (or at least until my husband finds out I kept EVERY left over program from out wedding. it seemed important at the time...)

I decided to tackle the boxes and go through each one to get rid of crap. Like the hoards of vases left over from the wedding. I am serious, we have about 40. If you need clear small & medium square vases for graduation, wedding, etc. e-mail me. I will sell them on the cheap! No joke. 

We have not accumulated tons of stuff yet so my project was not too big. It took my about an hour. I was on a sorting spree. 

We also had some random kitchen things we no longer use, a plate holder to a plate I broke months ago, random picture frames (SO MANY FRAMES! WHY?) 


I started with a large pile and sorted it down to about 5 boxes of things that we needed to keep (yes, I still have all the programs. one day I will get rid of them. I swear!)


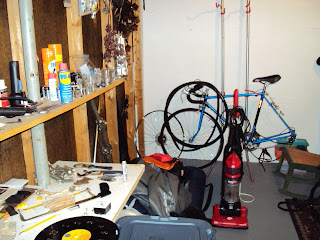
 This is my husband's side. I tried not to get rid of much here.


The casualities: some empty boxes, picture frames, random decor I don't use and unused kitchen utensils.

That feels better. 

And that is the last week of de-cluttering for me with Simple Mom! Thanks for all the help and inspiration!

25 March 2012

Week Two Cluttler Cleaning: Kitchen & Cabinets

Kitchen Cabinet. Urgh.
That is what I think of when someone mentions cleaning those.

Do I have to?

Better yet, why shouldn't I?

Tell you the truth, we moved in last July to our current home and that was probably the last time I really cleaned the cabinets. If you think about how much use they get every day, each meal and throughout out the history of the home; cabinets really should be cleaned a lot more!

I try to always wipe up spills, but really cleaning every shelf? Um, nope.


With this (read: really last weeks) clean up, I took the time to organize and really get rid of things in our cabinets we don't use.  Here is how I clean the cupboards:

1. I took out all the food items and sorted by what we use vs. what we NEVER use.

2. I wiped down all the cabinets with warm water and baking soda. Baking soda usually makes any strange smells disappear as well as is safe around food products (you use it in baking for heaven's sake!)

3. I rearranged the cabinet shelves to make the best use of our space, ours are moveable!

4. I put most of the baking items at the top and items we use every day near the bottom (I can't reach the top shelf without a stool or chair!)


At least a little better!


 I realized that we had a lot of one time or odd ingredients that were expired. We have a eat-the-entire-cupboard-rather-than-throwing-things-away policy at our house but I let it slide for these items.

We don't have a pantry or a large food only cupboard, so we tend to keep on hand what we know we can eat in a week. Cleaning out the cupboards gave us some extra space for new goodies.

I also cleaned the "junk drawer" we have. It serves a great purpose to keep things off the counters when we want to cook as we don't have tons of counter space. I got rid of of two of the THREE phone books we had and some random pieces of paper. It looks good enough for a junk drawer.

Junk Drawer. Good Enough.

It was nice to see more space in the cupboard and get rid of items we don't use. Now it's time to grocery shop!

19 March 2012

Pinnacle of Perfection

This post is not about perfection. In fact it is about perfection found in the messy, cluttered and confusing life.

I was over at Our Little Apartment blog reading the most read articles. I discovered one about the things the author does not do. I find it so refreshing that she could be honest about the things she doesn't do. I agree, sometimes blogs, especially beautifully designed and well written ones, seem so out of my league I am left wondering if I am not doing this blog thing right. Are these women (and men) really living in that beautiful of a house and look so put together every day?

As much as I love writing about the things that I do, there are plenty of things I don't do. I always strive to improve myself, make my life better, my days filled with more beautiful things, BUT I am not perfect. Not even close.

So, in honor of all the things I neglect or traits I lack:

I don't always remember to pay my water bill on time, much to my husband's dismay.

I don't blog every day.

I don't even think about my blog some days.

I don't iron my clothes on most days.

I don't know if I am going to run the marathon I signed up for in April.

I don't blow dry my hair most days.

I don't garden. tried. failed.

I don't wear lipstick. Ever.

I don't always cook dinner. Hello frozen meals!

I don't always call people back right away.

I don't check my personal e-mail every day.

I don't always like my job.

I don't have great confidence some times.

I don't vacuum under beds. Ever.

I don't know everything about the products I sell at my job.

I don't shower if I don't run that day.

I don't run every day.

I don't enjoy folding laundry. Hate it actually.


Ah, that feels better.

I much as I want things to be perfect, they will never be. The title of this blog is a good reminder to myself that "come what may" things will be ok. There is no perfect plan for life, de-cluttering my home or making dinner. It's ok.

The pinnacle of perfection is living. However messy that gets.

What do you not do?


15 March 2012

Running Essentials 101

There are literally hundreds of items runners use to keep healthy and have a fun, safe run. If you are new to running or just getting back into the swing of things, the marketplace can seem overwhelming.

Literally, one company of running shoes could have hundreds of options for shoes! Not to mention color choices, oh my!

Never fear! I am here to bring you running essentials 101! 

Now, I am not a coach (although that would be awesome, so e-mail me if you want my running resume!) or a certified expert. Instead, I am just a one woman show who has tested many products over many miles. I didn't always have a guide or book to reference, but through some time trials and bloody toes later I have found great products. I hope the guide helps you find some running essentials that make it easier and happier for you to run.

My parents helped by introducing  me to basic running clothes and shoes in High School. My dad was predominantly a football and basketball coach so we didn't have knowledge of the hundreds items runners use..As my sisters and I grew older, and wiser in our sports, we learned the tricks of the trade thanks to friends and teammates. When you're in high school, a good pair of training shoes, spikes and sport bras seem to do the trick.

I was lucky enough to have a job at a local running store while in high school. There I learned what kind of products were available and how they could help me run better. In college, when running became a serious relationship for me, I learned from my coach and teammates.

Not all shoes are alike, just as no runner is alike. What fits and feels comfortable to you might make someone else cringe. Wear what you find best suits you. I would love to look like I just walked out of the Athleta catalog after I get done running but instead I am a mismatch of sweaty cotton clothes.

I have been waiting to make a post like this for a while. I think about it every time I lace up my running shoes, picking out what products and accessories I wanted to showcase for you. I love finding new products and accessories that work well, I hope you can find something that suits your needs too!

All of the running equipment and accessories are things I actually use, pretty much on a daily basis. Some times I change the kind of shoe I buy, but if I know some thing works well I stick with it. Some articles of running clothes that work well I have had for over 5 years (and they smell like it some times...)

Click here for my version of running essentials:

12 March 2012

Week One Clutter Cleaning: Husband's stuff

Clutter Take One.

It seems like clutter can be a never ending task. One day you get rid of 3 things and the next you accumulate 5 more. I am striving to have less stuff, less mess and less clutter.

My first house hot spot was my husband's clothing and dresser. Since we have an extra room and some extra closet space, we keep my husband's clothes in there. We got an awesome dresser from a garage sale (can you say $5?!) when we moved in. Although he has to jockey his clothes around when we have company, it generally works out. I had been hinting at this de-cluttering project for a few weeks, so when it came time he was on board and ready to get rid of items. 


First, this is what it looked like when we started:


Things were really piling up! 

This is how we cleaned:

1.  My husband took out everything from the dresser and on top. 

2. He sorted the clothes into piles by type (jeans, shirts, long sleeves, etc.).

3. After discovering he had 8 pairs of jeans (we both are clothes horses some times!), he tried every pair on to see if they fit and if he liked them.

4. We made donation, keep and throw away piles. We found a few pairs of gym shorts that a previous dog had chewed through, those we threw away.

5. We keep those clothes sorted and put them away together so he could find each type of clothing easier. 

6. We hung up any items that needed to go in the closet.

7. We piled everything to donate in the car and off we were! 

Really it was simple and he was willing to get rid of things that no longer fit or were worn in. He is much better at making quick decisions about what to keep! I even took some of his energy and got rid of items I debating donating before. 

This is what it looks like now! Much better!


We felt inspired enough to get rid of a few winter items that we both noticed we didn't wear. 

Overall, this was a great project for us. Since we have been married, I haven't gone through his clothing or seen him get rid of things. Some of the items had seen better days, and are in a better place now!

I also took the liberty of turning this...


into that!


Stay tuned for next weeks de-cluttering project!


09 March 2012

Friday Bake Day: Cauliflower Mixer

For lack of a better term, mixer was all I could come up with for this recipe. Not a very appealing title for those who don't like veggies but it works.

This recipe has long been stored away in my recipe box. I honestly forgot that I had this one. I was looking to use up ingredients in my cupboard and refrigerator, and this one did the trick. 

I believe the original recipe came from a Real Simple Magazine issue last year. Their recipes some times call for a small amount of something I don't readily have, so I improvise with them. I have improvised wrong (think really onion-y broccoli soup...bad idea) but this time it worked out perfectly.  Originally this recipe was for a Cauliflower stew, with some chickpeas and tomatoes. Since I didn't have those handy I substituted with beans a little extra water. 

So without following the recipe exactly, using what I had lying around and not knowing what to call it, you have Cauliflower Mixer.

Cauliflower Mixer

3 tablespoons Olive Oil
dash of onion power or a small amount of chopped onion (I had onion powder around and use about 1 teaspoon)
1/2 teaspoon Ground Ginger
1/4 teaspoon each of Salt & Pepper
1 can Black Beans (15 oz.), drained
1/2 cup Raisins
1/2 head each of Cauliflower & Brocoli, cored and cut into florets
1 5 oz. package of Baby Spinach (I estimated on this, I only had a little left so I used what I had)
1/2 cup water
Package of grains of your choice (think couscous, quinoa, rice, etc.)

Heat oil, onion, ginger, salt & pepper. Add Cauliflower, Brocoli, Beans and Raisins. Add water (plus more if necessary to make mixture boil and not burn). Bring to a boil, stirring occasionally. 
Reduce heat to simmer. Let mixture thicken and vegetables cook for 15-20 minutes.
Meanwhile, cook rice (or other grain choice) per package directions.
Fold in spinach to cauliflower mixture for 1-2 minutes (until just wilted).
Serve cauliflower mixture with grains.


This combination could be changed out with any seasonal vegetable for a cheap, easy meal. I like that I could make this with ingredients I have on hand without having to slave for hours.

While trying to keep our food budget down, I opt for 1-2 meatless meals a week. I feel the compromise of a few meatless meals is a simple way to not necessary eat less food, just cheaper options. I am not a vegetarian, but after a meal like this I am satisfied and don't feel overly stuffed. 
If you have a picky eater, try to add some cheese on top or nix the spinach. Although spinach is high is so many nutrient categories, including iron, it can be a tough sell with kids & adults.

Happy eating!
 

06 March 2012

Tuesday Bake Day:Pear Tart

It's true. This post is making its appearance on Tuesday, not Friday as I have been trying to do. No one to blame but my 3D life!

Moving on...

How about a tart?

I really haven't cooked with pears very often but I am really thankful I did. Pears are juicy, but not too moist. They are easy to cut, pretty to look at and delicious! This tart dessert comes from the Parade Magazine (yes, the one found in the newspaper!) on Sunday. We had a recent influx of pears in our house and I was looking for a way to eat them all up. With only two people in our household, too much of something requires you eat it at breakfast, lunch and dinner.

So here I present, my newspaper recipe:


Pear Tart

1/2 Cup Butter, plus some for the pan
Juice of 1/2 a Lemon, divided
1 LB. Pears, cored & sliced 1/2" thick
1 Cup Flour
1 teaspoon baking powder
1/2 teaspoon salt
1 Cup + 2 tablespoons Sugar
2 Eggs
1 teaspoon Vanilla
1/2 teaspoon Cinnamon

Preheat oven to 375 degrees F.
Butter 9" circular pan. Squeeze half of lemon juice on pears.
In a small bowl, whisk flour, baking powder and salt.
In another bowl, mix cream 1/2 cup butter and 1 cup sugar with an electric mixer on medium speed until mixture is light & fluffy.
Beat eggs into sugar mixture one at a time. Beat in flour mixture until batter comes together.
Spread batter into pan. Wrap and chill for 20 minutes.
Place pears on top of chilled batter in concentric circles. Squeeze remaining lemon juice onto pears. 
Mix 2 tablespoons & cinnamon together. Sprinkle over pears.
Bake 45-55 minutes or until edges are brown.
Let cool 10 minutes before eating.

This pear tart was really great! I loved the way it smelt while baking and the crust was delicious. I will definitely be making this again soon!

Thanks for reading! Enjoy!